System Rescue Tools
- SystemRescueCD
- Memory Test
- Wipe Drive
- Reset Windows Password
- Recover data from unbootable drive
- Quick Disk Test
1. SystemRescueCd is based on Xfce (cholesterol free Linux) OS provided as a bootable CD or USB for administrating or repairing desktop systems after a crash. It aims to provide an easy way to carry out admin tasks, such as creating and editing the hard disk partitions, testing memory and disks, recovering files and partitions plus a multitude maintenance tasks. In short a rescue tool kit. Many of the rescue applications are also available on standard Live CD/USB’s which circumvent the need for this particular CD/USB. However this does have some useful extras which make it a bit easier to use, e.g. Windows password reset, Memtest86+.
To create the USB stick boot version you need at least a 512MB usb stick and may need to edit the target machine BIOS boot order to ensure the USB drive boots before the internal drive or hit the appropriate function key (usually F12) on boot to change the boot order. After creating label the media SYSRESCUE.
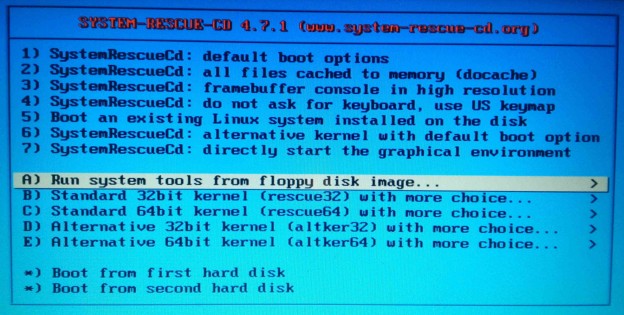
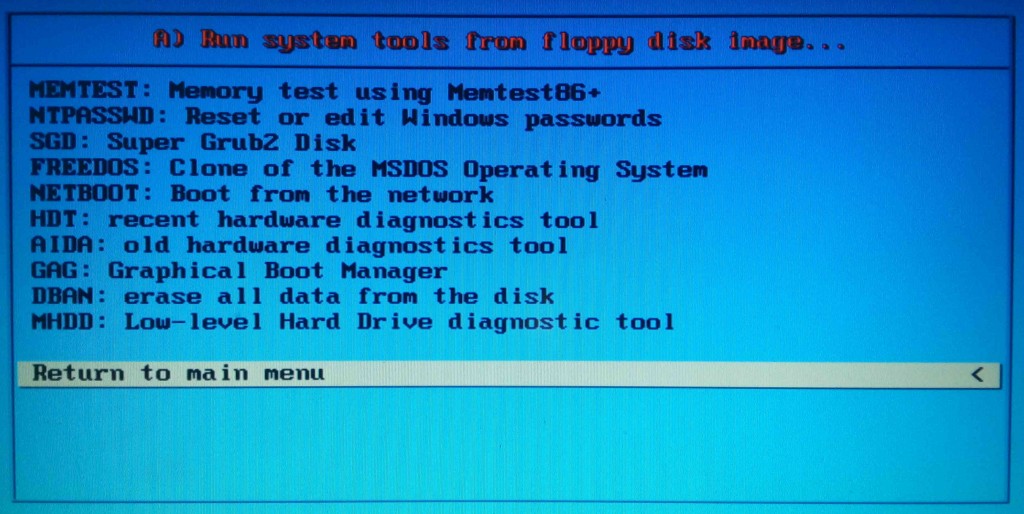
Once SYSRESCUE is booted it displays a number of bootable Linux options. Select the default (1st option) for standard Linux OS or the System Tools Menu to run a specific tasks which are explained below:
2. Test Memory using Memtest86+
Memtest86+ program will tell you if your physical memory is damaged or not.
To run Memtest86+ select “MEMTEST” from the system tools menu above
As soon as Memtest86+ starts press F2 (within 5 seconds) for multi-core mode or F1 Fail-Safe mode (single core). Otherwise it defaults to Fail-Safe mode. If you have a quad core processor in Mult-Core mode the memory test will run approximately 4 x faster.
Memory errors will be shown up in Red with corresponding ram area or it may hang in the defect ram area. If Memtest86+ hangs without any memory area indication re-run in Fail-Safe mode.
If no memory faults are found you will get a message at the bottom of the screen that says:
** Pass complete, no errors, press Esc to exit **
If you do nothing Memtest86+ will continue to run. One Pass is normally sufficient to prove the memory is OK. If you are paranoid about the memory reliability let it run overnight.
3. Wipe Drive Using Shred
From the main menu select the default boot option to boot Xfce desktop and run the following commands from Terminal:
umount /dev/sdX
shred -vfz -n 3 /dev/sdX
where
- v = verbose, show progress,
- f = force change of permissions if necessary
- z = add a final overwrite with zeros to hide shredding
- n = number of iterations (passes). As the default is 3 “n 3” in above example can be omitted
- /dev/sdX is the target device where X from fdisk example above would equate to /dev/sda
Wipe Drive using DD
This method is suitable for USB pen drives. Even just writing with zeros makes it nigh impossible to recover as the memory bits have been reset. Using a large block size makes it fast.
Note: Fast is relative. With large terabyte drives even writing with zeros can take several hours. However preferable to 10s of hours with repeated patterns.
umount /dev/sdX
To wipe drive with endless stream of zeros use:
dd if=/dev/zero of=/dev/sdX bs=64M
Writes to the drive until it runs out of space at which point you get an error
“No space left on drive …”. This error notes completion and is OK.
Display progress with PV (Pipe Viewer) – examples for a 1TB drive
cat /dev/zero | pv -brtp -s 1T | sudo dd of=/dev/sdX bs=64M
Or without PV using DD built in progress option
sudo dd if=/dev/zero of=/dev/sdX bs=64M status=progress
Or wipe with random numbers use:
cat /dev/urandom | pv -brtp -s 1T | sudo dd of=/dev/sdX bs=64M status=progress
Where:
- X is target drive letter – use sudo fdisk -l to discover drive designation
- if = Input file
- of = Output file or device
- bs = block size in bytes where suffix K= kilobyte (1024), M = megabyte (1024×1024), G = gigabyte, etc
- /dev/zero is a special Unix file that provides as many null characters (ASCII NUL, 0x00) as are read from it
- /dev/urandom is an “unlimited”/non-blocking random source which reuses the internal pool to produce more pseudo-random bits
- dd takes 1-2hrs to zero wipe a 1TB drive
4. Reset Windows Password using NTPASSWD
NTPASSWD system tool allows you to reset or edit a Windows user password. Useful back door if you have lost your Windows logion password. Note you can’t view the existing passwords. You can only change or clear them. When run NTPASSWD will automatically discover the candidate Windows partition(s) and list them for selection
Possible Windows installations found:
   1 sda2 228384MB Windows/System32/config
   2 sdb1  76316MB Windows/System32/config

Please select partition by number or
   q = quit
   d = automatically start disk drivers
   m = manually select disk drivers to load
   f = fetch additional drivers from floppy / usb
   a = show all partitions found (fdisk)
   l = show probable Windows (NTFS) partitions only
  Select: [1]
Enter number of the partition you wish to change
  Select which part of registry to load, use predefined choices
  or list the files with space as delimiter
  1 - Password reset [sam system security]
  2 - RecoveryConsole parameters [software]
  q - quit - return to previous
  [1] :
cat /dev/zero | pv -brtp -s 80g | dd of=/dev/sdX bs=4096After this NTPASSWD will then display a list of SAM user names and passwords to change. Once changed the SAM database will be updated.
Reset Windows Password – Manual Method
From the main menu select the default boot option to boot Xfce desktop terminal
Run fdisk command to discover and list all the drive partitions
#fdisk -l
Device Boot         Start         End      Blocks   Id  System
/dev/sda1              63      144584       72261   de  Dell Utility
/dev/sda2          145408     4339711     2097152    7  HPFS/NTFS/exFAT
/dev/sda3   *     4339712   165822455    80741372    7  HPFS/NTFS/exFAT
/dev/sda4       165822930   234436544    34306807+   5  Extended
/dev/sda5       165822993   231528779    32852893+  83  Linux
/dev/sda6       231528843   234436544     1453851   82  Linux swap / Solaris
Use mkdir to create a mount point for the Windows partition
mkdir /mnt/windows
Use ntfs-3g to mount the Windows partition to this mount point
ntfs-3g /dev/sda3 /mnt/windows -o force
If you get “Windows is hibernated, refused to mount” then try the following
ntfs-3g -o remove_hiberfile /dev/sda3 /mnt/windows force
Change directory to the Windows Config folder that contains the SAM database
cd /mnt/windows/Windows/System32/config
Use the chntpw command to list the Windows accounts in the SAM database
chntpw -l SAM
Select the account name, e.g. Mike that requires a password reset and use chntpw to change it
apt install chntpw #install if not installed already
chntpw -u "Mike" SAM
Once you issue the above command, you will see a menu of various options. To reset the password, press 1 and Enter. You will be asked to confirm that you want to reset this account, so press the y key and Enter. The account is now reset. Option 2 is used to unlock account
DON’T USE WIPE DRIVE UTILITIES BELOW WITH SSD DRIVES. Instead to wipe an SSD drive delete its partition(s) and create one partition for the whole drive and Trim this. Alternatively use the manufacturer’s Wipe drive utility.
5. Recover data over network from unbootable Windows drive
Boot SystemRescueCd and select default boot option.
Connect an Ethernet cable to the PC LAN port. Display PC LAN IP address as follows:
root@sysresccd % ifconfig -a
eth0 Link encap:Ethernet HWaddr 00:18:f3:ce:0e:36
inet addr:192.168.1.158 Bcast:192.168.1.255 Mask:255.255.255.0 <- example address
UP BROADCAST MULTICAST MTU:1500 Metric:1
RX packets:0 errors:0 dropped:0 overruns:0 frame:0
TX packets:0 errors:0 dropped:0 overruns:0 carrier:0
collisions:0 txqueuelen:1000
RX bytes:0 (0.0 B) TX bytes:0 (0.0 B)
Interrupt:16 Base address:0xe000
Set root password for SSH remote access
root@sysresccd % passwd
List Windows partitions using fsarchiver
root@sysresccd /root % fsarchiver probe -v
[=====DEVICE=====] [==FILESYS==] [=====LABEL=====] [====SIZE====] [MAJ] [MIN]
[/dev/sda1       ] [ntfs       ] [Windows-XP     ] [    25.00 GB] [  8] [  1]
[/dev/sda5       ] [ntfs       ] [Data           ] [   120.00 GB] [  8] [  5]
[/dev/sda6       ] [ntfs       ] [Backup         ] [    70.00 GB] [  8] [  6]
Create Windows mount point and use ntfs-3g to mount Windows partition to it
root@sysresccd % mkdir /mnt/windows
root@sysrecccd % ntfs-3g -o ro /dev/sda5 /mnt/windows
Display Windows drive folder to verify you have the correct partition
root@sysresccd % cd /mnt/windows
root@sysresccd /mnt/windows % ls -l
total 132856
-r-------- 1 root root      245 2008-08-05 19:36 boot.ini
dr-x------ 1 root root     4096 2008-07-02 07:34 cygwin
dr-x------ 1 root root     4096 2007-10-23 21:18 Documents and Settings
-r-------- 1 root root    47772 2005-03-25 12:00 NTDETECT.COM
-r-------- 1 root root   297072 2007-10-21 18:50 ntldr
-r-------- 1 root root 16777216 2008-09-22 16:41 pagefile.sys
dr-x------ 1 root root     4096 2008-08-10 19:07 Program Files
dr-x------ 1 root root        0 2008-07-02 07:45 RECYCLER
dr-x------ 1 root root     4096 2007-10-21 17:59 System Volume Information
dr-x------ 1 root root    32768 2008-08-29 22:48 WINDOWS
Using Filezilla on another PC on the same network configure it as follows to access the Windows partition using SFTP:
- click on File/Site-manager in the menu bar
- click on new-site to create a new connection
- fill the dialogue window with the following information:
- Host name for the connection
- Host: 192.168.1.158 (IP address of the computer running SystemRescueCd)
- Port: 22
- Server type: SFTP (SSH File Transfer Protocol)
- Logon type: Normal
- Login: root
- Password: type the password set in the previous step.
- Click on “Advanced”
- Set Default Directory: /mnt/windows
- Now click on connect
You can now transfer data from the Windows partition to this PC
Once finished unmount the Windows partition and shut down unbootable PC
root sysresccd % umount /mnt/windows
root sysresccd % shutdown now
5. Quick Disk Test
Smartmontools is a set of applications that can test hard drives, automatically notify you when the failure rate rises and read the hard disk SMART statistics to detect failures early.
Install gsmartcontrol
sudo apt-get install gsmartcontrol
# Run gsmartcontrol from terminal
gsmartcontrol
Select drive and Quick Disk Test. If the drive passes “Quick Disk Test” (takes about 2 mins) the drive is OK.