Use Windows Check Disk to Repair Your Drive
Sometimes, your computer is noticeably slower or programs “hang” when you access certain files or upgrades fail or programs just won’t run. This odd behaviour might occur because there is corruption of within the files system on your hard disk drive.
You can troubleshoot the problem by using the Windows Disk Check tool called CHKDSK. Check Disk can identify and automatically correct file system errors and make sure that you can continue to load and write data from the hard disk. You can use Check Disk in all versions of Windows not only for local hard drives, but also for removable media such as USB memory sticks or memory cards.
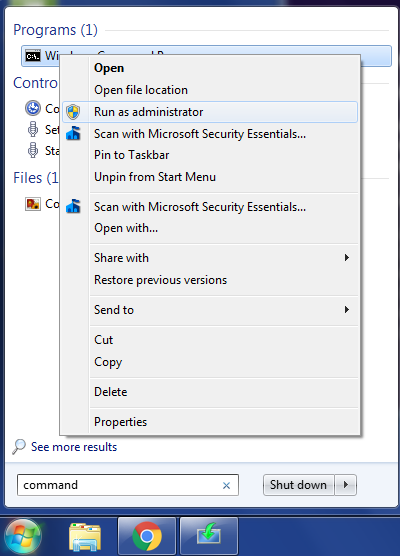
To run Check Disk, for example in Windows 7 click of the Start button (round bottom left-hand icon) and type “command” in the search text box. Then in the results list right-click on Command and select “Run as Administrator”. This will launch the Command line window with Administrator rights.
In the black Command Line window enter the following command and hit Enter to execute Check Disk command.
chkdsk c: /f
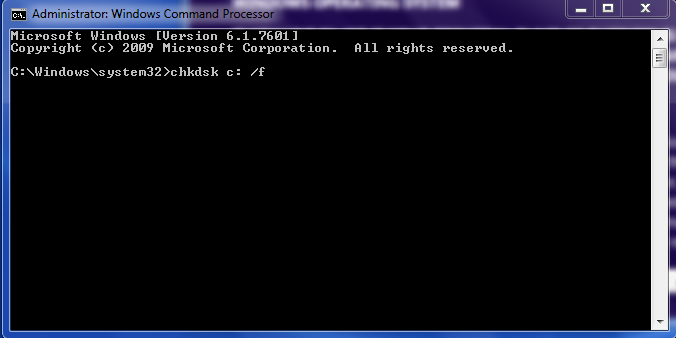
In the CHKDSK command line C: refers to your system drive and the /f switch tells CHKDSK to automatically fix data file errors, e.g. cross-linked files, orphans, etc.
As this is the System drive, once you hit the Enter key, CHKDSK asks you if you want to schedule the command run the next time the computer boots up. Just answer Y(es) to the question and then close any programs restart your computer.
When the computer starts it will run the CHKDSK command before booting Windows. The time this takes to run depends on the size of data on your drive and can vary from 5-10mins to hours. If possible watch the process and note from CHKDSK on-screen log if it fixes any errors. If it does fix errors then this will be a good result as the problems you may been experiencing may be more likely to be fixed. Alternatively if you have no errors you can rest assured your disk file system is intact and good shape.
View CHKDSK Log (run at Boot time)
Annoyingly CHKDSK does not have an option to write its results to a log file on the desktop. Instead CHKDSK writes its log to the Event Viewer -> Windows Logs -> Application event log Event ID 1001, Wininit. For most users this a challenge to remember and find!
To make viewing the CHKDSK log easier we can make use of use of Windows Powershell to find the results and output them to an easy to find location.
To view the CHKDSK log do the following
Press the Windows + R keys to open the Run dialog box and type powershell, and press Enter.
In the Powershell window copy and paste the command below, and press Enter.
get-winevent -FilterHashTable @{logname="Application"; id="1001"}| ?{$_.providername –match "wininit"} | fl timecreated, message | out-file Desktop\CHKDSKResults.txt
This command searches the Event Viewer Application logs for the first “ID 1001, Wininit” entry and outputs the results to “Desktop\CHKDSKResults.txt”
After running the command you can view the log by double-clicking CHKDSKResults.txt file on the Desktop.
To view a non boot time CHKDSK log use the following variant of the Powershell command
get-winevent -FilterHashTable @{logname="Application"}| ?{$_.providername –match "Chkdsk"} | fl timecreated, message | out-file Desktop\CHKDSKResults.txtCredit for Powershell command Seven Forums chkdsk read eventlog